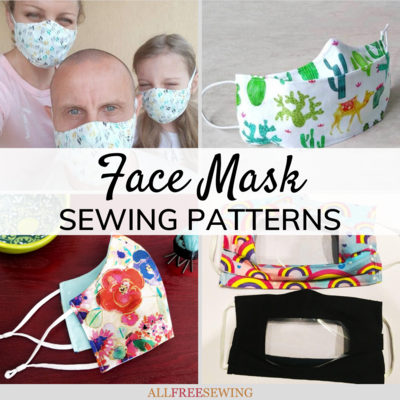
Seams And Scissors

  • Home
  • About
    • Contact Us
  • Quilting
    • Baby Quilts
    • Bed Quilts
    • Mini Quilts
    • Quilt Blocks
    • Throws & Lap Quilts
  • Sewing
    • Accessories
    • Clothing
    • Decor
  • Tutorials
  • Giveaways

DIY: Multipurpose Travel Organizer

February 10, 2017 by Katie King 4 Comments

Hello Everyone! My name is Katie and I blog over at Running with a Glue Gun. Today I’m going to be showing you how to make a fun multipurpose travel organizer!

With the New Year upon us, you may be trying to get organized and possibly are wanting to learn a new skill (like sewing), If that is the case, then I have the perfect project for you! Today I will be showing you guys how to make a simple multipurpose organizer, which can travel with you!

This multipurpose travel organizer is designed to be used however you want. The designed itself is sort-of like a make-up brush holder but it could be used to hold sewing supplies, art supplies, or even jewelry tools. In regards to the sewing, this project is very similar to making a pillow. That is because there is a lot of sewing around a number of sides and then flipping the entire piece right side out. So, if you’ve made a pillow before, this project (I promise) will come easy to you.

Finally, for this project, I decided to only use one style or pattern of fabric. This was only because I wanted to make the project as simple as possible. However, you could use one style of fabric for the outside and one style of fabric for the inside of your organizer. With that being said, I did use about 1 yard of fabric to create this organizer.

To find out how to make your own multipurpose travel organizer, keep reading below!

Supplies

  • Fabric
  • Scissors
  • Needle + Thread
  • Sewing Pins
  • Ruler
  • Fabric Marker
  • Ribbon
  • Sewing Machine + Thread

Before Getting Started:

For this project, I recommend using a sewing machine to make the whole process go by much quicker. For example, I was able to make this project in under an hour by using my sewing machine. However, if you wanted to sew this multipurpose travel organizer by hand, you totally can!

Step 1: Cut out two pieces of fabric which are 18-inches by 14-inches.

Step 2: Cut out one piece of fabric which is 18-inches by 12-inches.

Step 3: Take your 18-inch by 12-inch piece of fabric and fold it in half with the right sides facing together. Then take the fabric piece to your sewing machine and sew around all three sides, leaving a hole to turn the piece inside out.

Once you’re done sewing, turn the piece inside out and sew up the small hole you made. When your completely done, you should have something like the above picture.

Step 4: Now grab one of your pieces of fabric that is 18-inches by 14-inches and you’re now smaller 18-inch by 6-inch piece. Then lay the smaller piece on top of the larger piece and pin together. When your pieces are pinned together, grab your fabric marker and draw lines where you want your pockets to be. Above, you will see I made five pockets. However, you could make as many or as few pockets as you want.

When you have everything marked, take the whole piece to your sewing machine and sew around the three sides (of the smaller piece). Then begin sewing where you drew your lines for your pockets.

Step 5: Grab your fabric piece with the pockets and your other 18-inch by 14-inch fabric piece. Now pin both pieces of fabric together with the right sides together. Then take the piece to your sewing machine and sew around all four sides, leaving a hole to turn the piece inside out.

Once you’re done sewing, turn the piece inside out and sew up the small hole you made.

Step 6: Find the middle of your multipurpose travel organizer and mark it with your fabric marker. Then draw a small line on both sides of that mark. Finally, grab your scissors and cut a small slit where you drew your two lines. Then, feed your ribbon through that slit.

Once you’ve added your ribbon, you’re ready to use your multipurpose travel organizer!

I haven’t decided yet how I’m going to use my organizer, but I loved using it for sewing supplies! It definitely made finding scissors and smaller items like measuring tape much easier to find.

As you may have noticed, this travel organizer is designed to either be rolled up or folded in half. Personally, I like rolling it up, since it takes up less space in my bag. However, depending on what you put in your organizer, I wanted to give you both options.

So, if you made this multipurpose travel organizer, what would you use it for?

  • Author
  • Recent Posts
Follow Me
Katie King
Blogger at Running With A Glue Gun
Katie King is a DIY blogger, who believes that crafting should be simple, fun and unique! By day, she is a college student studying business, and, by night, she is a crafty blogger. She started her blog, Running with a Glue Gun, in order to share her DIY projects and to meet other people who loved to craft!
Follow Me
Latest posts by Katie King (see all)
  • Halloween Black Cat Wall Hanging - September 11, 2020
  • DIY: Stackable Felt S’more Coaster Set - August 19, 2020
  • DIY: Fabric Camera Strap - August 7, 2020

Share and Enjoy !

0Shares
0 0

Filed Under: Sewing Tagged With: DIY organizer, easy sewing, multipurpose travel organizer, organization, Organizer, travel, travel organizer

Comments

  1. Lyn Murphy says

    February 13, 2017 at 11:01 pm

    Oh thank you for sharing this. I’ve been wanting to make an organizer to contain all my sewing necessities, like my seam rippers, thread snippers and assorted machine feet etc. I wanted something to hang over the edge of the table, held in place by the weight of my sewing machine and this could easily be achieved with a few modifications to this pattern. All the patterns I’ve found previously were quilted and I haven’t’ learned to do that yet.

    Reply
  2. Barbara Quinn says

    March 16, 2017 at 4:52 am

    This is the coolest site I really enjoy reading it. It gives me neat little sewing tips & some short cuts . But mostly I like to sew because it keeps me out of trouble with shopping to much. I really like the thrift stores to get the designer discards of bolts of fabric & other discards when I see bedding items I see beyond that to what can I make with all this fabric! Most people see bedding , I see curtains, place mats, napkins, & coasters, & etc.

    Reply
    • Seams and Scissors says

      March 22, 2017 at 8:26 am

      We’re so glad you like our site!

      Reply
  3. Juvonna Chatman says

    April 9, 2020 at 11:58 pm

    I’m excited about this tutorial. Sounds very quick and easy. Thank you.

    Reply

Leave a Reply Cancel reply

Your email address will not be published. Required fields are marked *

Email Email Facebook Twitter Pinterest YouTube RSS

Subscribe to the Seams and Scissors Newsletter.

Full Pattern Tutorials

DIY Vintage Hipster Bag

DIY: Bright Fabric Scrap Wall Hanging

Archives

More Recent Posts

We Sewed a Zoo: 8 Stuffed Animal Patterns

Tips and Tricks Tuesday: 5 Simple Steps to Start Upcycling Old Clothing

Vintage Vixen: Retro Dresses to Match Your Personality

DIY Upcycled Denim Bag

Upcycled Sweatshirt to Classy Cardigan

See All Posts Here

Categories

Our Favorites

Transform Your Space: 9 DIY Home Décor Darlings

16 Easy Sewing Projects for Mug Rugs

Sewing

Vintage Vixen: Retro Dresses to Match Your Personality

Quilting

The White On White Log Cabin Quilt Block

Tips

Tips and Tricks Tuesday: 5 Simple Steps to Start Upcycling Old Clothing

Baby Patterns

Nursery

Get the Look! DIY Baby Nursery

Free eBooks

How to Make a T-Shirt Quilt: New Free eBook!

Full Projects

Summer Accessory Must-Have: Night-Out Purse Sewing Tutorial

Prime Publishing Craft Group
Copyright © 2021 · SeamsandScissors.com - A Prime Publishing LLC property. All rights reserved.

About Us Advertise Contact Us FAQs Privacy Policy Do Not Sell My Personal Information Subscribe Terms of Service Unsubscribe

Copyright © 2021 · Tidy Theme on Genesis Framework · WordPress · Log in